
Научете как да проектиране на плакат в Adobe Photoshop с нашите експертни, лесни за следване видео урок…
Този видеоклип е част от поредицата ни уроци за дизайн в Adobe Creative. Моля, уверете се, че абонирайте се за към канала на Solopress в YouTube, за да не пропуснете бъдещите ръководства!
Как да създадем плакат
Посетете уебсайта на Solopress (www.solopress.com), за да изтеглите безплатното ръководство за шаблони за плакат A0 на Photoshop като основа за вашия плакат.
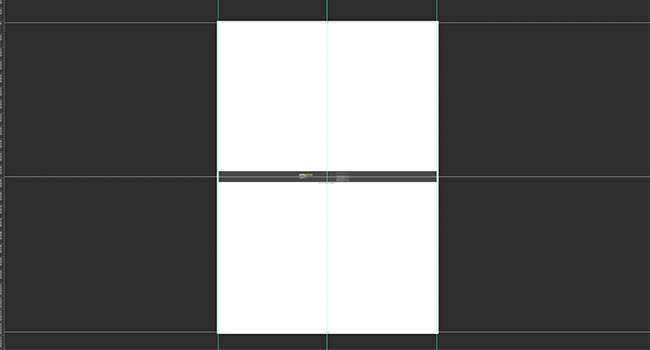
Отворете файла във Photoshop, създадохме водещ слой, който ще ви помогне да оформите сватбената си покана - той включва зоната на отстъпите, подрязването и безопасната зона.
Област на отстъпите - всичко, което се намира тук, ще бъде отрязано, но не забравяйте да разширите всички цветове или изображения в тази 3-милиметрова област на отстъпите, за да избегнете появата на бели линии по време на етапите на довършване на печата.
Подстригване - задачата ви ще бъде изрязана по плътната черна линия, като всички изображения или текст, поставени в тази 3-милиметрова зона, могат да бъдат неправилно подрязани.
Безопасна зона - съхранявайте цялата си информация в бялата зона. Не забравяйте да използвате изображения с висока разделителна способност (300dpi) за най-добри резултати.
Създайте нов водач, като щракнете и плъзнете върху вертикалния и хоризонталния линийка (ако линийката не се появява във Photoshop, натиснете Command + R).
Създайте 4 нови водача по линията на безопасната зона. В този видеоклип съм създал 2 линии, които минават през центъра вертикално и хоризонтално, можете да зададете точните размери, като щракнете върху View - New Guide (Изглед - Нов водач) и въведете 420,5 мм за вертикално и 594,5 мм за хоризонтално.
Да започнем!
След като сте поставили водачите, можем да започнем работа по фона. За да създадете едноцветен фон, щракнете върху Слоеве-Нов слой за запълване-Перен цвят. В тази демонстрация използвам цвят за запълване вместо изображение или шарка, защото ще добавя форми, за да му придам дълбочина.
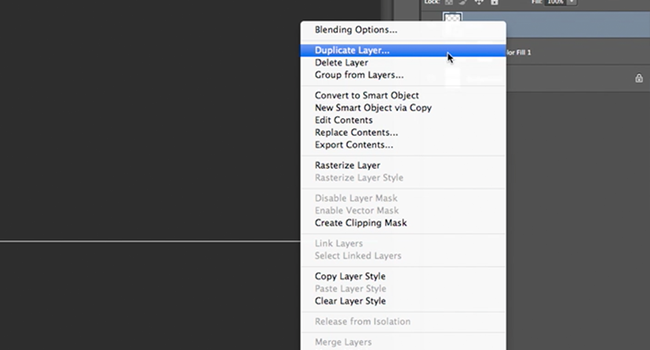
Сега започвам да добавям формите си, като плъзгам изображенията от папката, Когато плъзнете изображение, веднага ще имате достъп до мащаба, завъртането и обръщането на изображението. Ако искате да промените някоя от тези опции, след като изображението е поставено, изберете слоя и щракнете върху Редактиране - Трансформиране. Поставям изображението на моите линии и искам да го копирам, за да направя модел. За да копирате изображението, щракнете с десния бутон на мишката върху слоя и изберете Дублиране на слой.
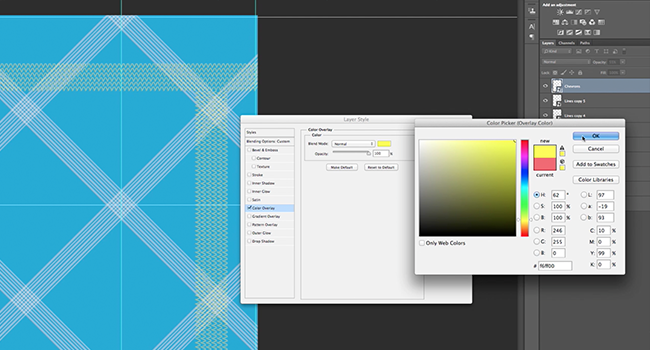
При добавянето на изображението на шевронния модел промених цвета на изображението. За да направите това, щракнете с десния бутон на мишката върху слоя и изберете Blending Options (Опции за смесване). В този прозорец можете да наслагвате плътни цветове, градиенти и шарки, както и да добавяте щрихи, капковидни сенки и променете непрозрачността на слоя.
Сега е време да добавите текст, за да го направите, изберете инструмента за текст в страничната лента, щракнете където и да е в проекта и започнете да пишете. Можете да променяте шрифта, размера, разстоянието между редовете и други опции с помощта на панела Character Panel (Панел на символите), който е достъпен в основната лента с опции за текст в горната част. Можете да мащабирате (не бих препоръчал, вместо това променете размера на шрифта), завъртате, обръщате и т.н., като използвате функцията Edit - Transform (Редактиране - Трансформиране), която споменах по-рано.
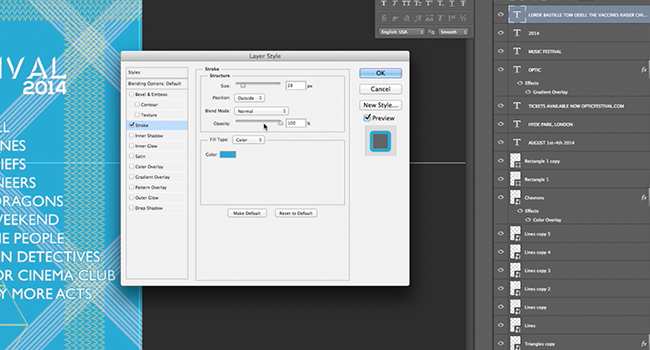
След като всички текстове и изображения са поставени, искам да добавя ленти за заглавието и долния колонтитул. Използвах инструмента "Правоъгълник" в страничната лента, за да очертая формата, която ми беше необходима. След това промених външния вид, като използвах опциите за смесване.
За да не се губи белият текст в шарките, използвах опциите за смесване и направих щрих в същия цвят като фона, след което намалих непрозрачността до смесване.
Когато сте доволни от дизайна си, не забравяйте да изтриете слоя с шаблона!
За да се подготвите да го изпратите за печат, запазете го като PDF файл, като използвате опциите в менюто Save As, след което следвайте инструкциите на уебсайта Solopress.
Ето и един разтърсващ плакат за фестивалния сезон!
Ако имате някакви коментари или въпроси относно подготовката на печат на плакати, моля, използвайте раздела за коментари по-долу и ние ще направим всичко възможно да отговорим на вашите въпроси.
Благодарим ви, че гледате нашия видео урок!


Благодаря за урока. Трябва да създам няколко плаката за благотворително събитие, което организираме, в момента нямам Photoshop, но определено ще го разгледам (в зависимост от цената), тъй като плакатът, който сте създали, изглежда наистина професионално.
Не можах да разбера какво представлява триъгълната решетка. Изглеждаше като вмъкнато изображение, но не можах да го разбера.
Много полезно, благодаря ви 🙂
Много информативен благодаря
Обичам да чета уроци за Photoshop, винаги има нещо ново, което мога да науча
Това е толкова полезно и интересно. Благодаря ти.